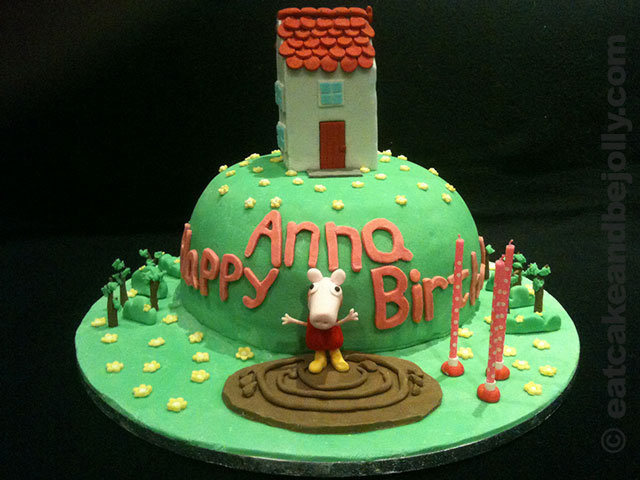
Peppa Pig – Anna’s 3rd Birthday (2010)
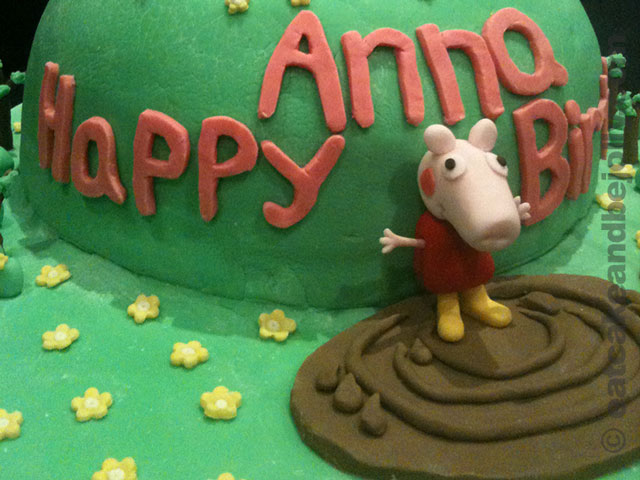
Anna was a big fan of Peppa Pig, so for her third birthday I wanted to recreate the cartoony feel of the original. The obvious cake location was the hill where Peppa lives, with her house on top.
Modelling Peppa herself was fairly straight-forward, but this was my first time modelling sugarpaste, so this was quite challenging enough! Having her jumping in a muddy puddle was definitely the right scene, given how much Anna loved recreating this scene whenever she saw a puddle… Simple trees, bushes and flowers finished the scene.
The cake was a vanilla madeira cake, coloured bright pink with a chocolate ganache filling between the layers.

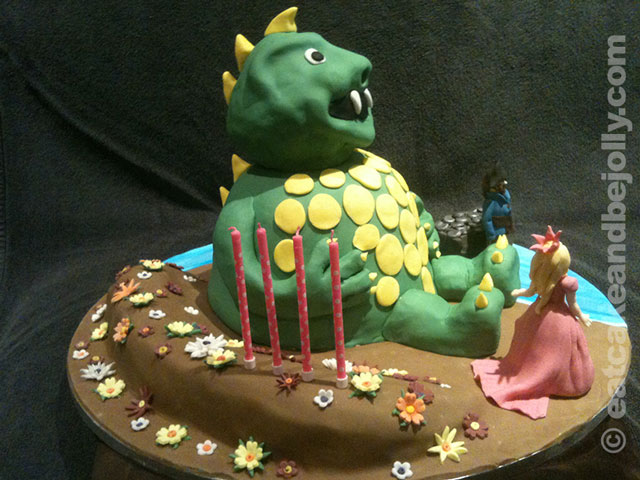
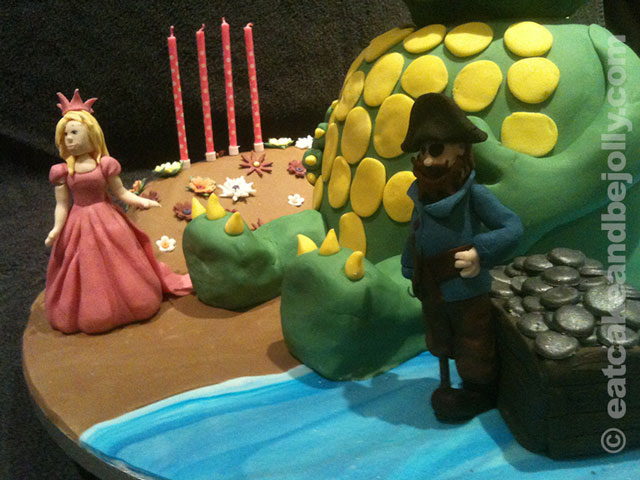
Princess, Pirate and Dinosaur – Anna’s 4th Birthday (2011)
At the time, these were the three favourite characters for Anna and were requested for the cake. Not particularly easy to integrate them into the same scene, but I chose to make a dinosaur based on a cake from one of Debbie Brown’s books, using raspberry jelly to give pink colour, structure and some flavour to a madeira cake.
I decided to make a beach scene, with the sand dunes made from green madeira cake (using lime jelly) – this was also used for the treasure chest. The pirate and princess challenged my modelling skills, but I was really pleased with how they came out. The pirate’s body was made from modelling chocolate – the first time I had used it. Given the challenge of a peg leg, the firmness of the chocolate was very helpful. The marbled water effect was made by adding some blue colour to the white sugarpaste and not mixing it in very much before rolling it out. The coins were discs of sugarpaste brushed with edible silver paint.

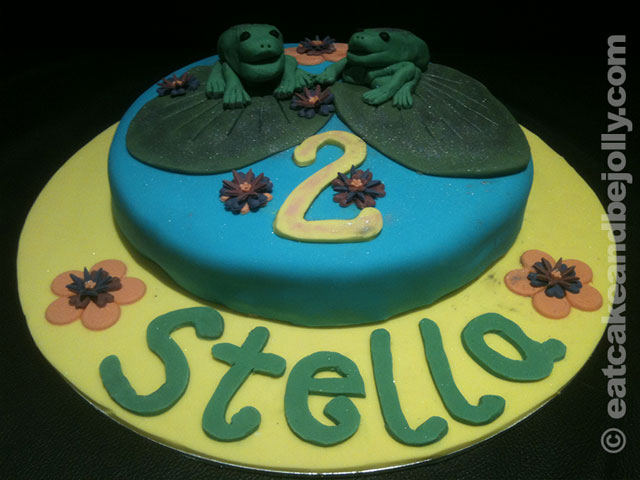
Frogs – Stella’s 2nd Birthday (2011)
We used to have a colony of frogs in the light well at the back of our house. They must have fallen down from the garden. I assumed they wouldn’t be able to survive, so arranged for them to be taken away by an animal charity. When they said it would be fine for frogs to live there, we then created a habitat with water pools and shelters. Feeding the frogs with live crickets became a favourite activity for the girls and a highlight of birthday parties!
This was a simple cake with a couple of frogs on their lily pads, dusted with edible lustre dust with a chocolate cake inside.
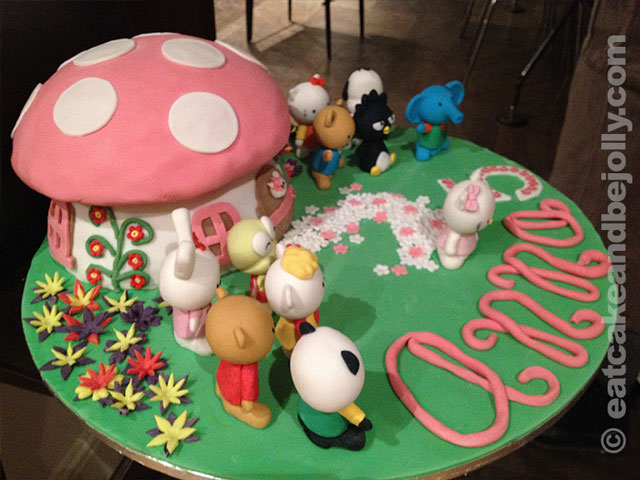
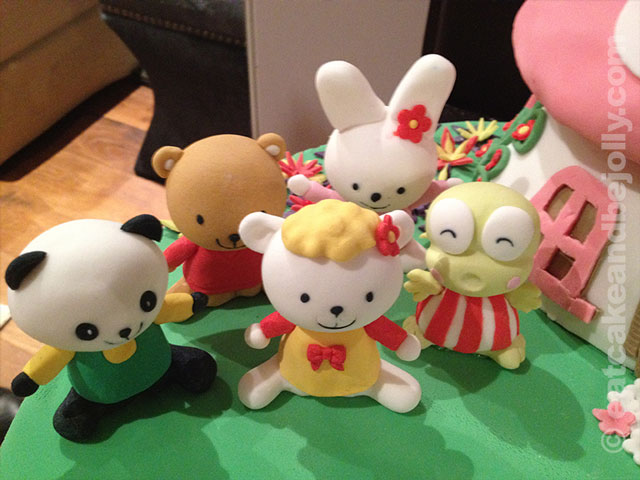
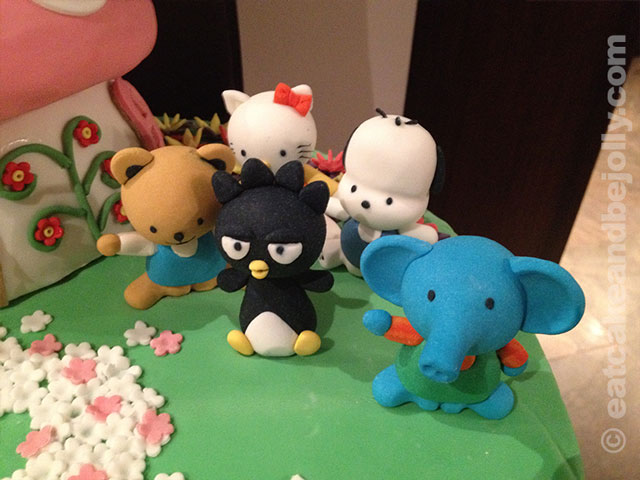
Hello Kitty and Friends – Anna’s 5th Birthday (2012)
We had a Hello Kitty house that the girls loved, and I recreated this for the main cake. The characters were recreated as accurately as I could make them – the whiskers and other small details make them look much more engaging.
The font for Anna’s name is an attempt to recreate the actual ‘Hello Kitty’ font! The number five is covered with edible pink diamonds that I bought. The cake was a simple vanilla madeira cake – given the need for the top to stay firm and not sag, the firmness of a madeira cake was ideal.


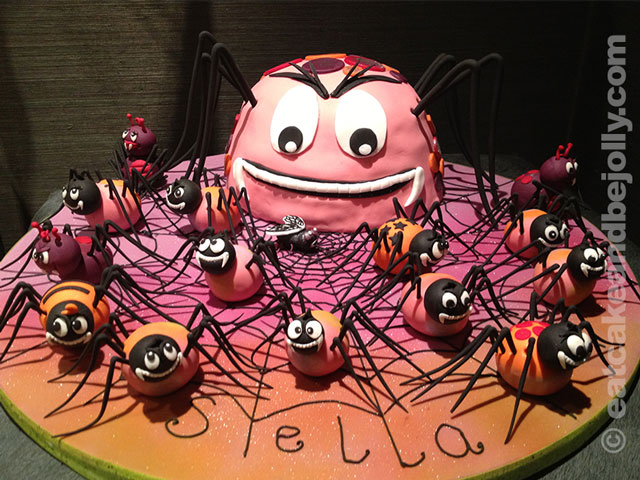
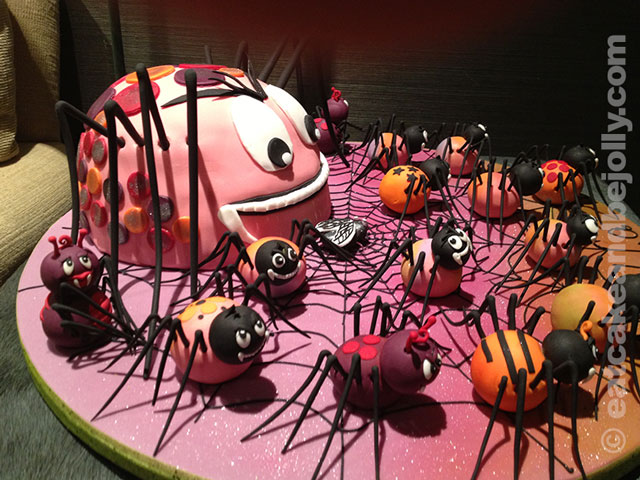
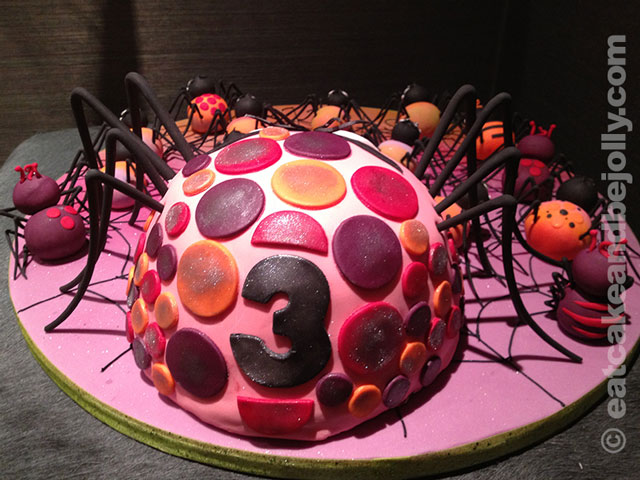
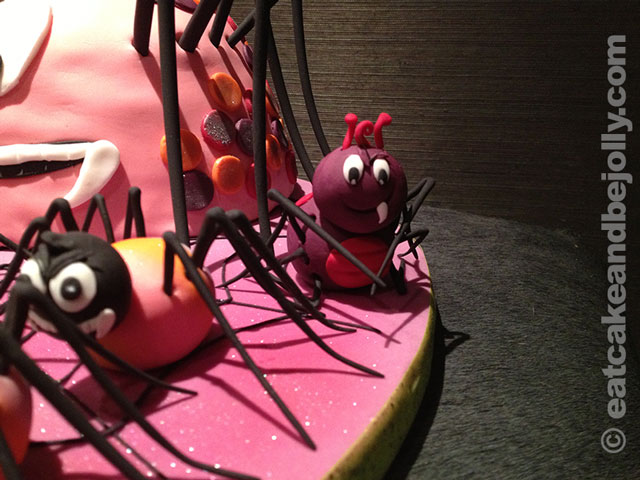
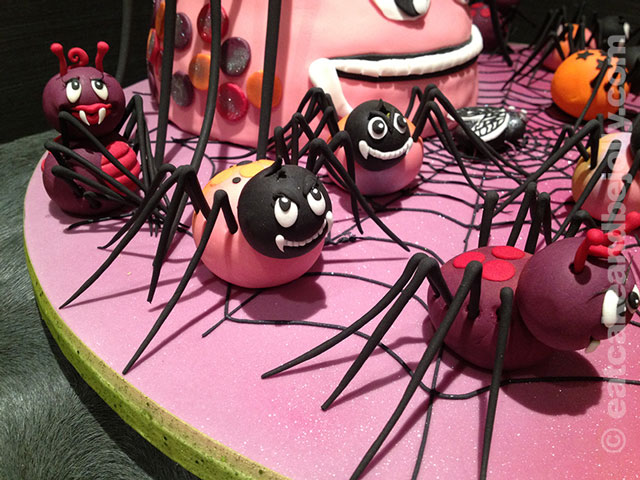
Spiders – Stella’s 3rd Birthday (2012)
Stella was really keen on spiders… Making the legs out of sugarpaste was something that had to be done a few weeks in advance to let them set firmly enough to stand up. The small spiders were fairly straight-forward, but the legs on the large spider proved very challenging and I found that I could only attach them to the cake just before serving, otherwise they would sag or break. I tried giving the small spiders different personalities by using different poses and facial expressions. Hopefully, the big spider’s imminent attack on the spider is scary without being too scary for a bunch of 3-year olds!
The base was made by using sugarpaste and edible lustre dust powders with a large make-up brush, then piping on chocolate to create a spider’s web with a small, paper icing bag.
The cake was layered with different colours as Stella was starting to get into rainbows (a theme developed more fully the next year).
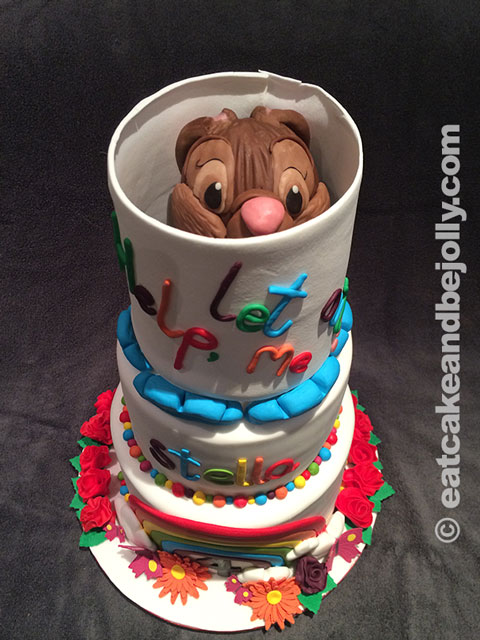
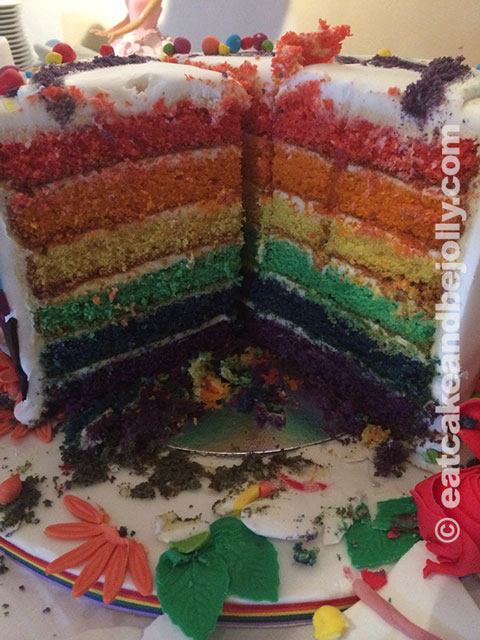
Rainbow Thumper Cake – Stella’s 4th Birthday (2013)
OK – so by now the girls are starting to raise the bar with the briefs to their daddy. Stella originally wanted a chocolate Thumper rabbit (her favourite soft toy at the time was Thumper) that would burst out of the cake. Having extensively explored explosive options (including car airbag systems), I decided that there weren’t any explosive options that were safe to use in front of a bunch of children!
Instead, I persuaded her to let me set things up so that she could break Thumper out of the cake. Oh, and the cake had to be a rainbow cake (rainbows have been big with her for a while). So, I made a Thumper out of modelling chocolate and put it on top of a tub of carrots, made from coloured white modelling chocolate. The cake layers were coloured as appropriate, but I also got liquid food flavourings to match the colours – grape (purple), raspberry (blue), lime (green), lemon (yellow), orange and strawberry (red). The filling and crumb coat were buttercream.
I then made a cage out of pastillage (using a cylindrical piece of expanded polystyrene as a frame) and a matching hammer. The lid was pastillage too, covered with rainbow-coloured sugarpaste balls. My first attempt at roses decorated the base. The hammer worked perfectly, thank goodness, and Thumper was revealed in all his glory!


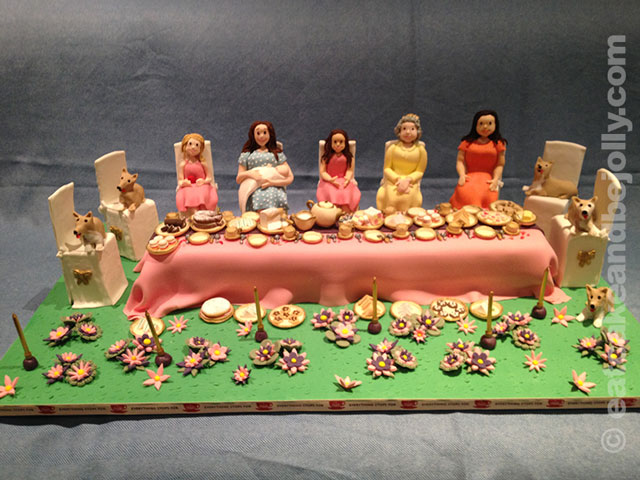
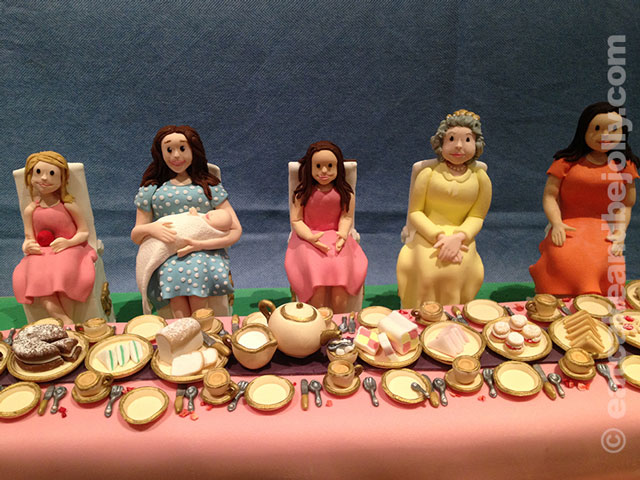
Royal Tea Party Cake – Anna’s 6th Birthday (2013)
Probably my favourite cake to date. Anna wanted a royal tea party with the Queen and Princess Catherine. It was soon after she had given birth to her eldest son, George, and the royals were very big in our household. I tried to recreate Princess Catherine’s dress and pose when she left hospital with George.
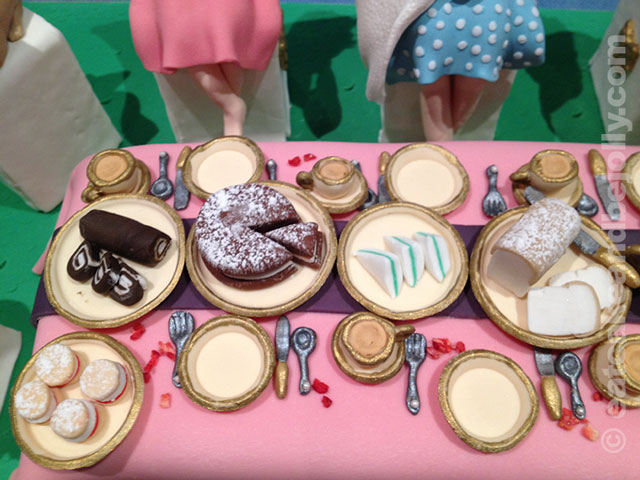
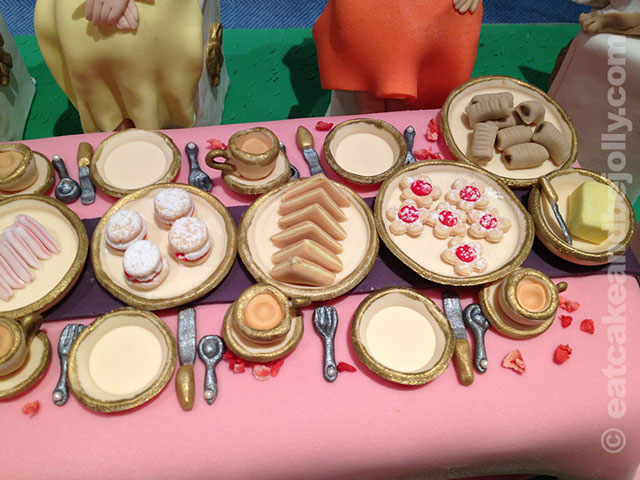
The madeira cake formed the table, with most of the effort going into the food, crockery and cutlery, as well as the figures themselves. I started off with the sandwiches and got increasingly into bread, scones, tarts, cakes, sausage rolls, swiss rolls, cookies etc., as well as the cutlery – painted with edible gold and silver paint. I put a tiny edible ‘pearl’ on the handle of each spoon and fork.
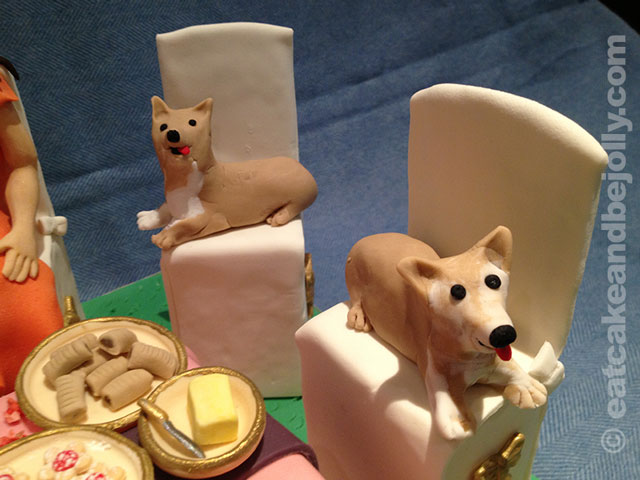
The characters are the Queen, Princess Catherine, as well as my wife, Anna and Stella… plus some royal corgis.

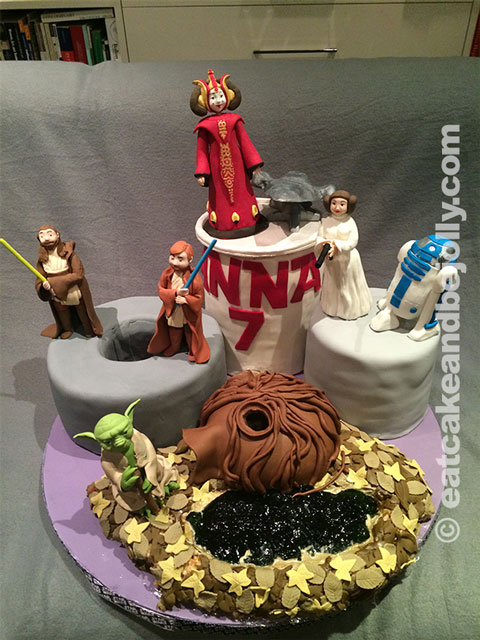
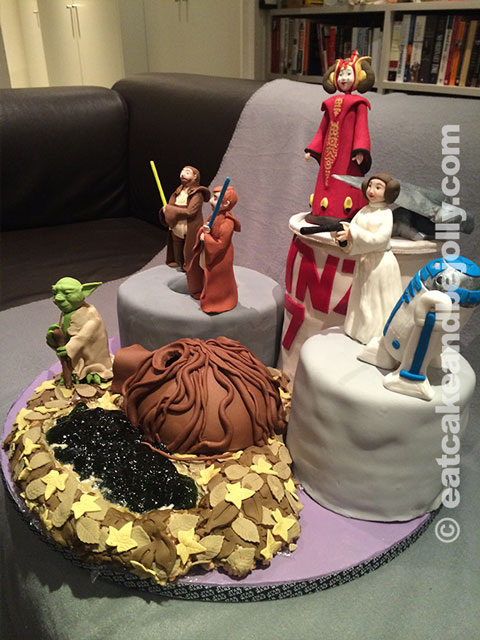
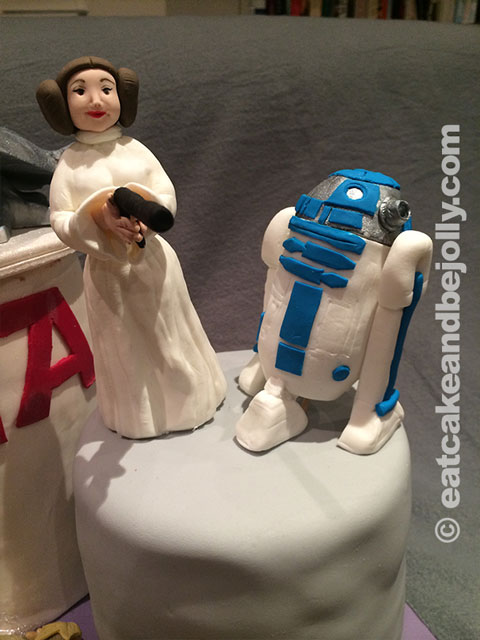
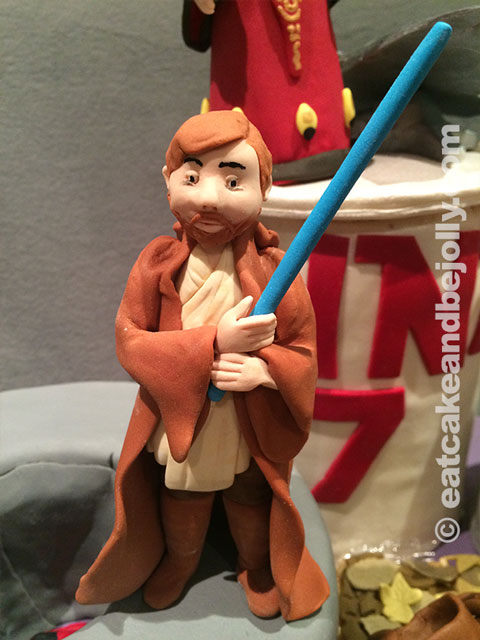
Star Wars Cake – Anna’s 7th Birthday (2014)
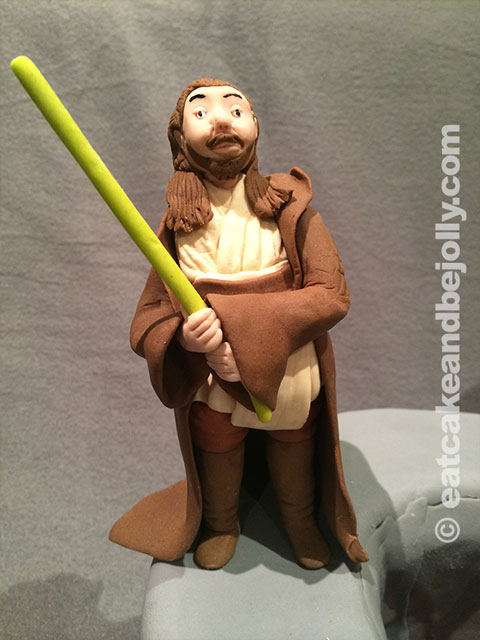
Anna loved the ‘good’ characters from Star Wars, in contrast to her sister! The brief was clear – a cake with Princess Leia, Queen Amidala, Yoda, Obi-Wan Kenobi and his Jedi Master, Qui-Gon Jinn (from Episode 1…). I decided to make four different cakes to create different tableaux for the characters.
Princess Leia was, of course, from the start of Episode 4 – A New Hope, along with R2-D2. She was on a madeira cake with a honeycomb buttercream filling. I created Queen Amidala in her most formal, dramatic outfit along with her shiny Naboo Royal Starship on a landing strip. She was on a chocolate madeira cake with a chocolate ganache filling. The ship was sugarpaste with a lot of CMC glue to harden it, sprayed with an edible silver paint.
For the scene with Obi-Wan Kenobi and Qui-Gon Jinn, I loosely recreated the battle they have with Darth Maul (but with a happier ending, with both Jedi Knights surviving!) by creating a cake with a hollow centre (where Darth Maul’s body falls at the end of the battle). In the bottom of this hole, I made a Darth Maul ‘corpse’ with swirled black and red sugarpaste and a couple of yellow eyeballs! This was a madeira cake with a chocolate Oreo buttercream.
The most fun part was Yoda and his cave on Dagobah (from Episode 5 – The Empire Strikes Back). The swamp base was made from Rice Krispies treats covered in sugarpaste leaves, with the murky water made from green jelly. The cave was modelled from chocolate modelling paste. To make the scene more atmospheric, I got some tiny coloured lights.
Having experimented to find the smallest lights I could find, I finally used ‘finger lights’ that worked really well and put them inside. I also put a small earthenware bowl set into the base of the cave and, just as I served the cake, added in some dry ice and then some water – the effect was great! It took a bit of practice and experimentation to get the ratio of water and dry ice right.
As I had to buy a reasonably large quantity of dry ice, I ordered ‘Chillisticks’, which allow you to put a single pellet of dry ice inside, then add the stick to a drink. Given that the dry ice is protected from being touched, this made them safe for the children to have at the party. They were very fun!


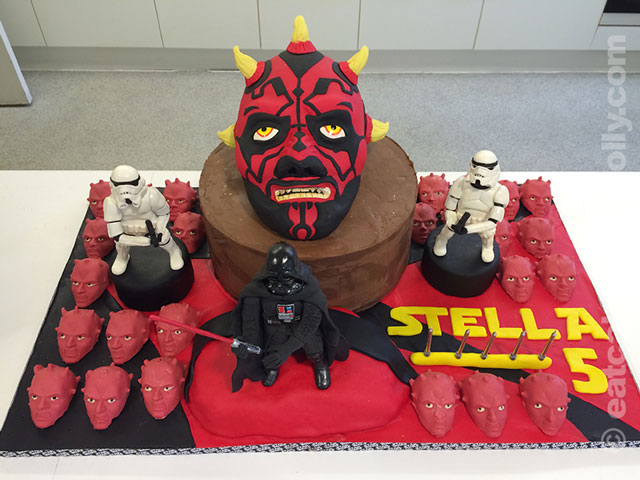
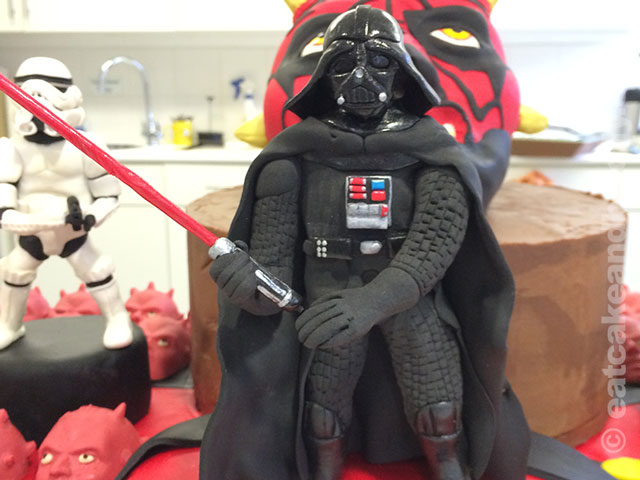
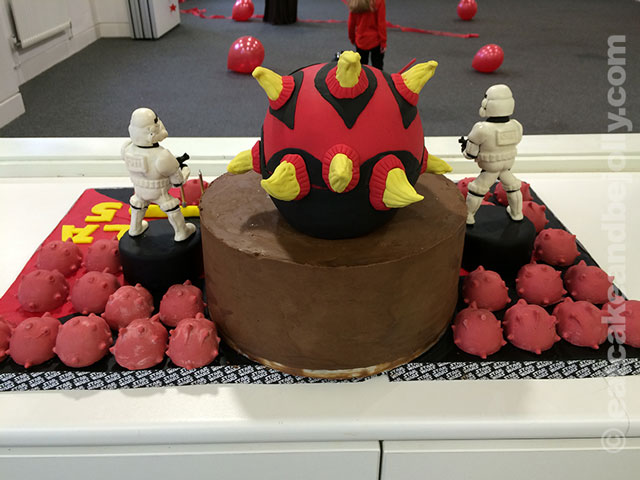
Darth Maul Cake – Stella’s 5th Birthday (2014)
This was the year that the Frozen movie was becoming the fourth biggest-grossing Disney movie of all time and every single party that Stella attended was a Frozen party (please let it go…), except for Stella’s party… who wanted a Darth Maul theme…
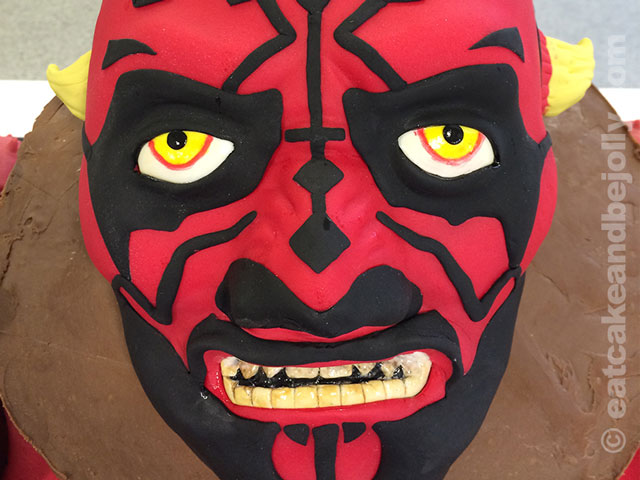
The main Darth Maul head I made from Rice Krispies treats, covered with sugarpaste. I used confectioner’s glaze to make the eyes and teeth shiny. The small heads were made by making a soft, silicone mould of the head (ripped off, but then replaced) of Stella’s bobble head Darth Maul toy.
I used silicone putty to make the moulds. You simply knead together the blue and white putties. Initially, I made the moulds a bit too thick, but with practice made them thinner, which made it much easier to unmould the final heads.
I then filled the mould (I actually made a few of them to speed things up) with tempered (tempering is important for chocolate – see my ‘Advice’ section for more information) white chocolate coloured with red cocoa butter (you can’t add normal edible liquid colours to chocolate) and added eyes with piped white and dark chocolate. I had experimented with making these into filled chocolates (with a ganache filling), but this proved too challenging to unmould.
The main cake was our favourite chocolate Oreo cake with an Oreo buttercream filling and a simple dark chocolate ganache coating. I was going to cover the cake with sugarpaste, but rather liked the raw look of the ganache finish against the characters.
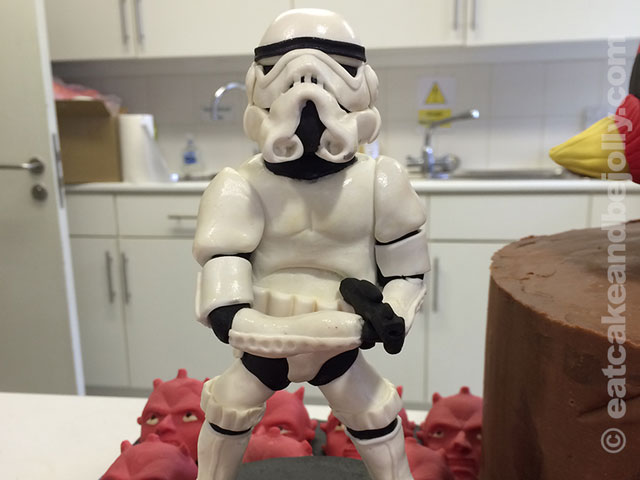
The Darth Vader and stormtrooper characters were rather labour-intensive, as I tried to make them as accurate as possible. I painted the bits that should look shiny with confectioner’s glaze (the same for Darth Maul’s eyes and teeth).
I used the Star Wars font for the writing and found a Star Wars ribbon. The red and black colours covering the sugarpaste cake drum looked good, but was a compromise because I ran out of black!
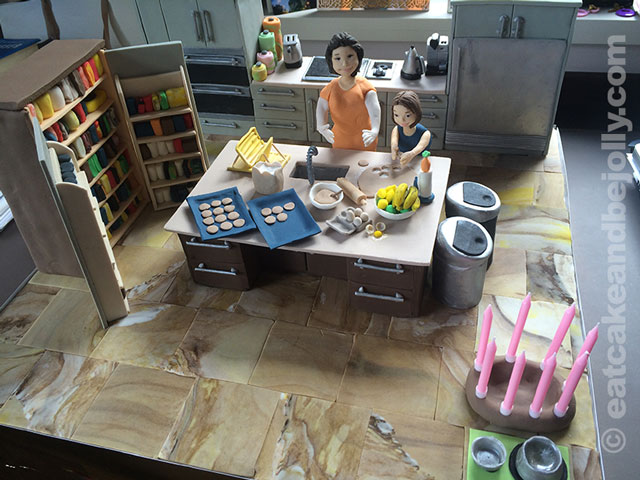
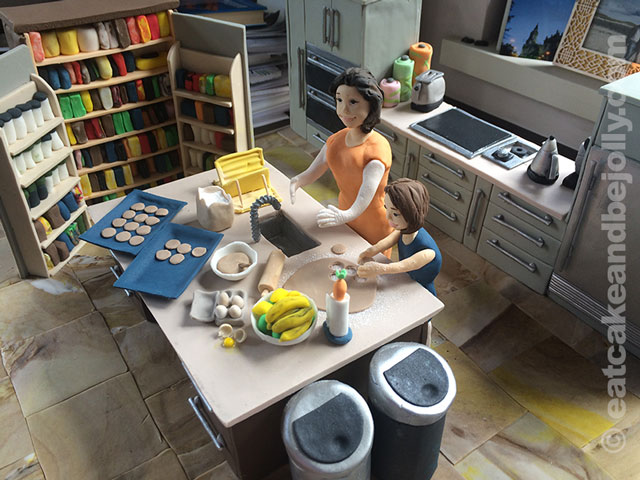
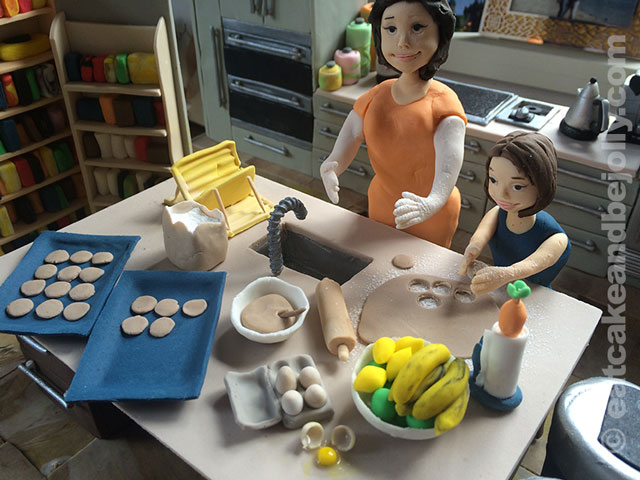
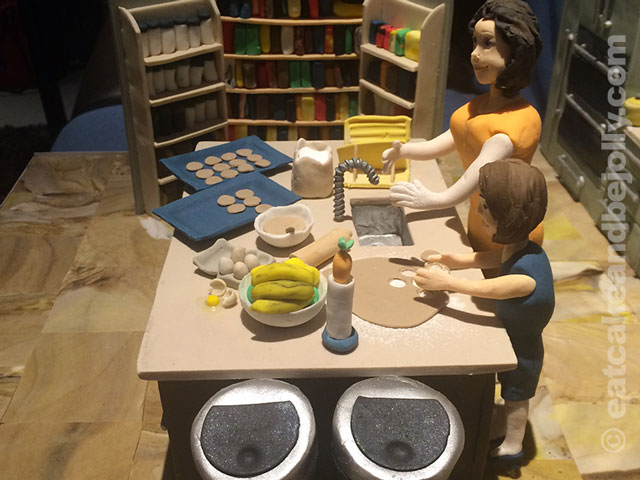
Kitchen Cake – Anna’s 8th Birthday (2015)
Anna wanted a cooking party this year, so I decided to make a scale version of our own kitchen. So that I could concentrate on using sugarpaste, not cake (with all the challenges of dealing with crumbs) for the kitchen, I made the design on a cake drum and used a second cake drum below for the cake, separated by cake dowel pillars.
Pretty much everything is to scale and accurate (even the details of our Nespresso coffee machine) for the equipment we have in the kitchen. I didn’t accurately recreate every item in the larder cupboard, however!
The Island and cupboards were made with sugarpaste hardened with CMC and left to set for a few weeks before assembling. Anna and Dara are making cookies (a favourite family activity), so I made some of the ingredients for the cookie dough as well as the actual cookie dough and baking trays. The bag of flour is filled with icing sugar. My favourite detail was the egg – simply made by making a sugarpaste shell, a yellow sugarpaste yolk, covered in a bit of piping gel.
In trying to recreate our stone floor tiles, I roughly mixed together some different shades of brown sugarpaste with white sugarpaste and rolled them to give a marbled effect.
Caramel (our Cavalier King Charles Spaniel) has her food and water bowl in the bottom right and the candles are on top of her dog bed.
There was choice from four cakes for the girls: chocolate Oreo cake with an Oreo buttercream filling and topping; vanilla Oreo cake with an Oreo buttercream filling and topping; Red Velvet cake with a cream cheese filling and frosting; and a chocolate cake with a dark chocolate ganache filling and frosting.


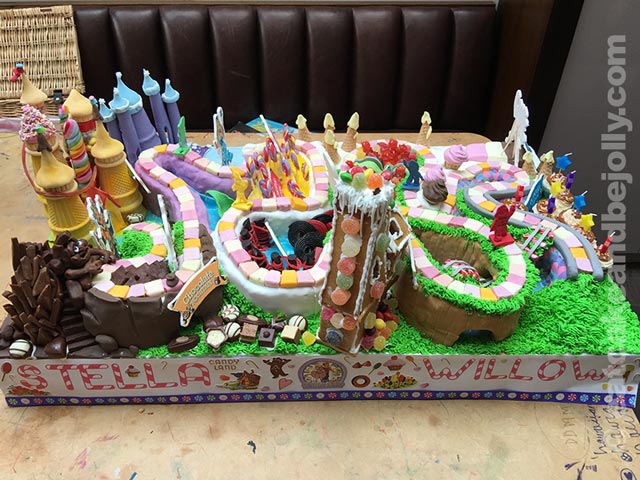
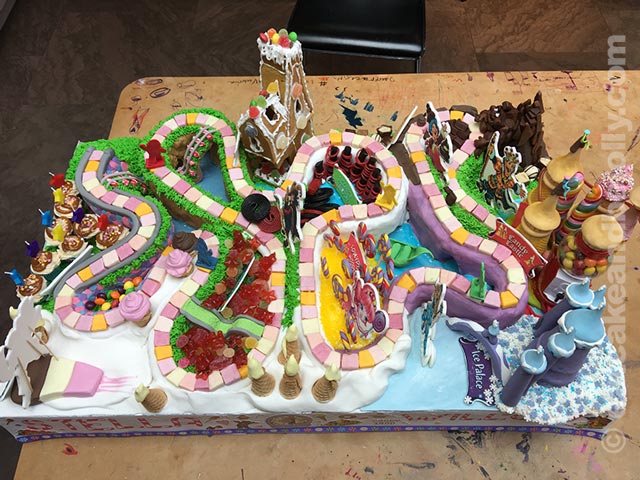
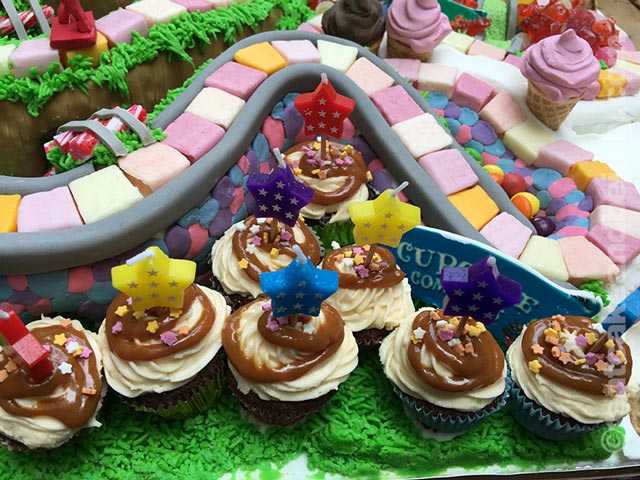
Candy Land Board Game Cake – Stella and her friend Willow’s 6th Birthdays (2015)
Stella loved both the board game (the US version) and the cartoons that she used to watch again and again on YouTube.
There was also a Candy Land cake on YouTube, and Stella asked me to make this. Given that this was a fun, but rather simple cake, I decided to make a more realistic version! Luckily, Stella’s friend, Willow, with whom she was sharing the party, was happy to go along with Stella’s cake plan.
As this cake took a lot of forward planning and preparation, I decided to make the game on a cake drum and use an identical cake drum underneath to house the four different cakes, so that I could add them at the last minute to ensure freshness. The drums were separated by pillars made from cake dowels.
The game board was made with Rice Krispies treats to allow me to give it a dramatic 3D structure. The squares on the cake were Starburst candy. I got a grass piping nozzle (Wilton #233 multi-opening piping tip) to make the grass from buttercream. The board game pieces were made by pressing sugarpaste into the actual plastic board game pieces (to give them accurate features and size) and sticking these figures to a sugarpaste base.
Each of the sections of the cake has an edible signpost and character. These I made by scanning images from the actual board game or from the Internet, then sending them off to a supplier who printed them with edible inks on thin sheets of sugarpaste. I cut them out of these sheets and glued them onto slightly thicker pieces of sugarpaste with a lot of CMC glue in, to allow them to set hard. These were produced weeks in advance to allow them to set hard.
As we progress along the board, here are the various sections:
Cupcake Commons – I made mini salted caramel cupcakes with a liquid caramel filling (and a stack of extra larger ones for the parents). I put star candles in the cupcakes.
Ice Cream Slopes – I bought waffle ice cream cones, cut them down and added sugarpaste to look like ice cream.
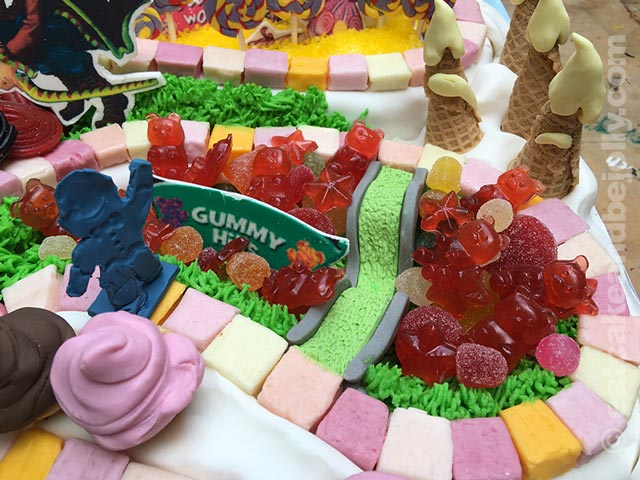
Gummy Hills – we already had a gummy candy maker with which we had made different types of gummy candy, so I used this to make gummy bears. I also used some bought Jelly Tots.
Gingerbread House – I made some gingerbread and cut it to a template that I made, trying to recreate the shape of the house from the board game. I stuck the bits together once they had hardened and glued them together with royal icing, adding Jelly Tots as decoration.
Liquorice Lagoon – I created the pillars of the lagoon from liquorice sticks wrapped with strawberry laces and added liquorice swirls to finish. I made a delicate leaf boat with a leaf veining mould.
Lollypop Woods – I made swirled lollypops out of sugarpaste and used yellow sugar crystals as a base.
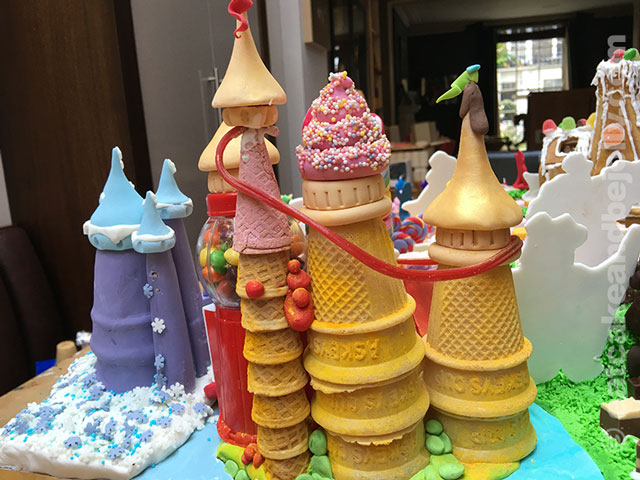
Ice Palace – the main tower was made from a waffle ice cream cone, with the smaller towers being solid sugarpaste. I bought some sugar snowflake decorations and added these at the end.
Chocolate Mountain – this was made from chocolate modelling paste to allow me to add details such as the staircase and the chunky slabs of chocolate rock.
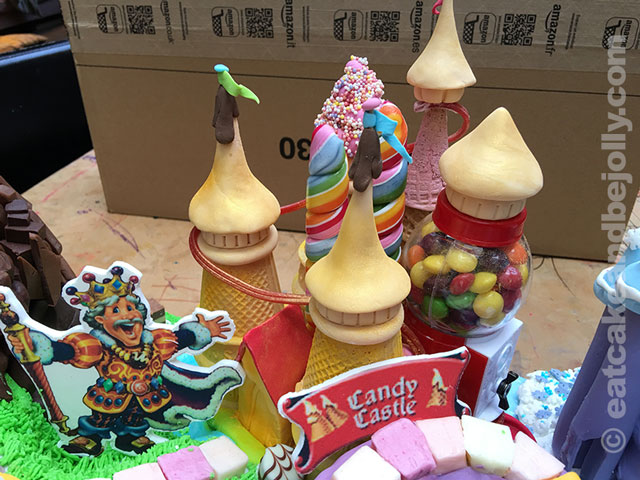
Candy Castle – I managed to find a mini gumball dispenser and used this as the centre of the castle, adding bought swirly candy lollies and towers made from waffle ice cream cones, dusted with edible coloured powders and sugarpaste turrets.
I finished the cake with gold card connecting the two levels and stuck white card with Stella and Willow’s names on, using the specific Candy Land font.


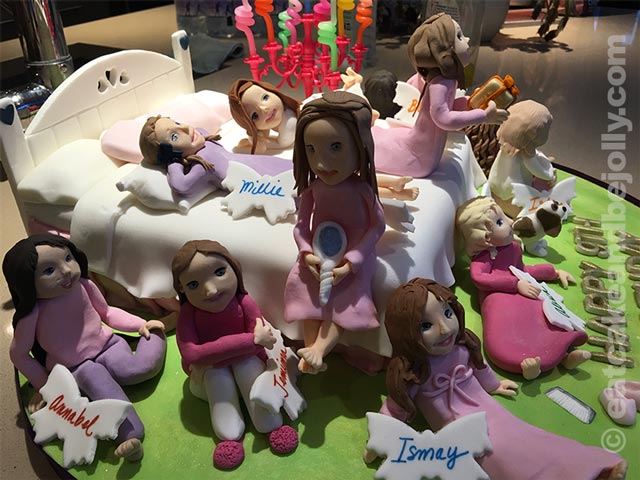
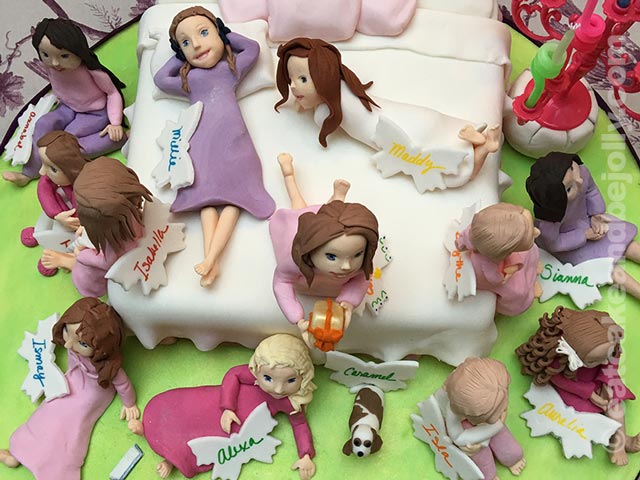
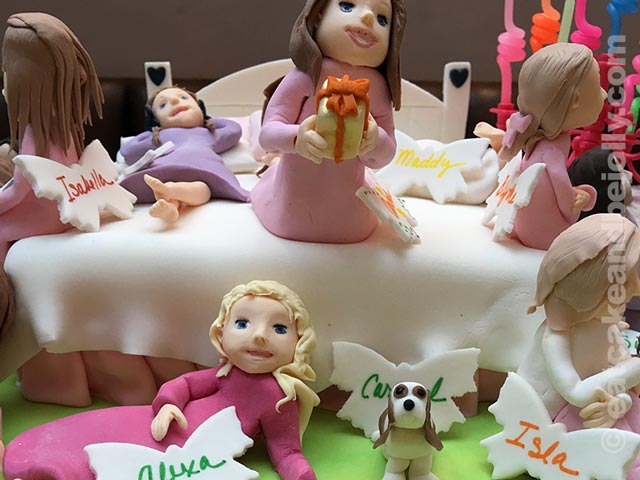
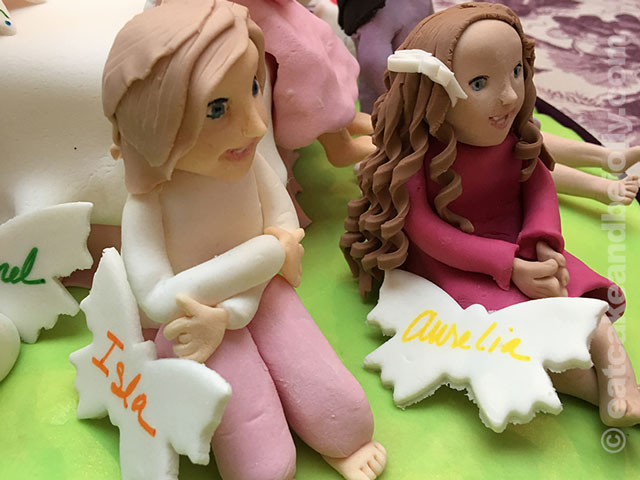
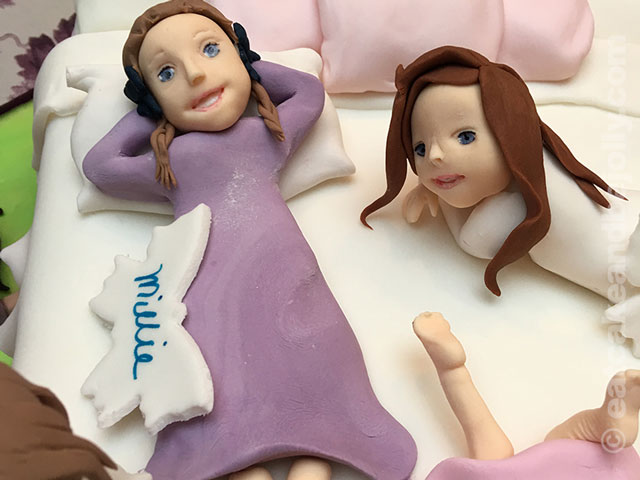
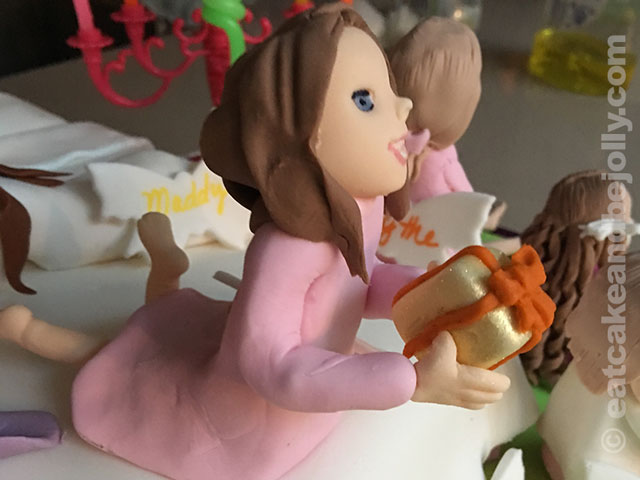
Slumber Party Cake – Anna’s 9th Birthday (2016)
Anna had eleven friends sleeping over for this birthday party (many of our friends described us as ‘brave’ for this endeavour, but it went off without a hitch!), after having gone out to dinner at Daphne’s in London (travelling in a very loud stretch limo disco singalong). Dara got photos of all the girls from their parents and I created sculptures of each girl based on this photo. I then made a simple label for each girl (in case my sculpting wasn’t clear enough!) using a butterfly stamp and edible ink pens (Dara’s writing is better than mine, so she did the writing). Anna was, of course, in the middle of the bed holding a present. Caramel, our dog, also featured.
The cake (chocolate Oreo cake with an Oreo buttercream filling and topping) was the bed, with sugarpaste linens and pillows. I rolled out white sugarpaste on the board and dusted it with edible green glitter dust and used a lettering set for the writing, covered in edible gold paint.
The candelabra was perfect – this was bought at Tiger, and I also managed to find curly candles in different colours.


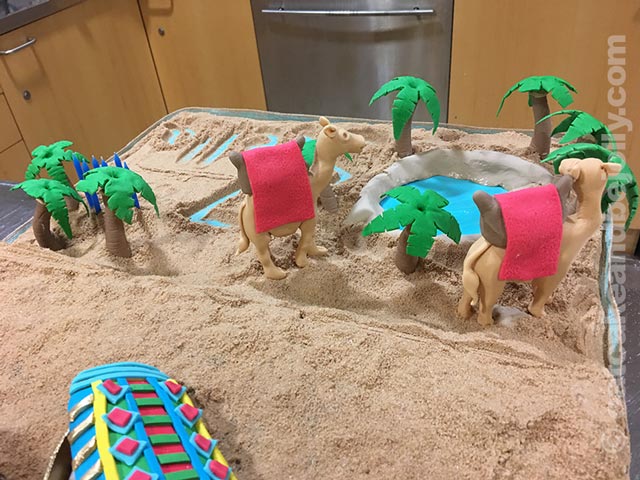
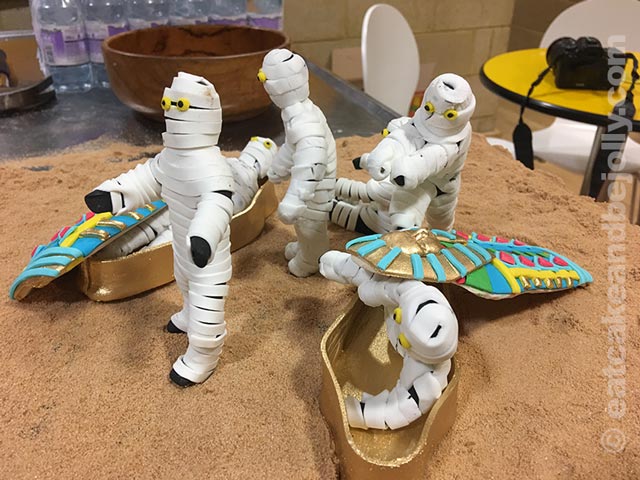
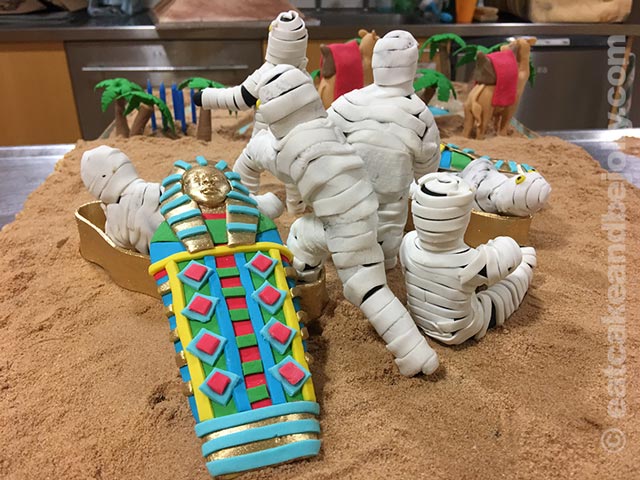
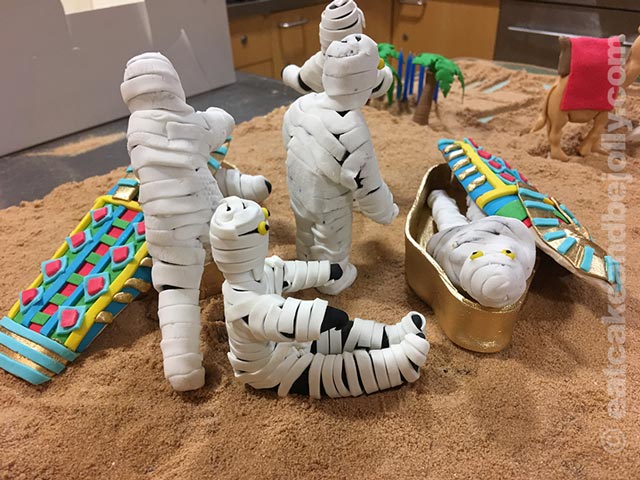
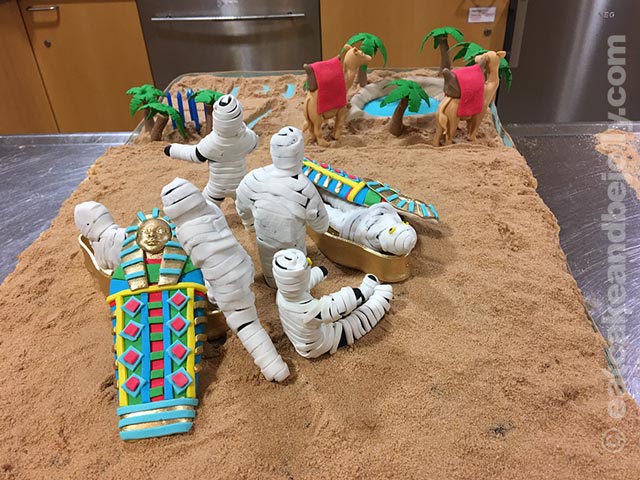
Pyramid Cake with Mummies – Stella’s 7th Birthday (2016)
Stella had become obsessed with ancient Egypt and wanted a pyramid cake… but one that she could smash with a hammer and find a bunch of mummies inside. By this birthday, it was pretty clear that Stella didn’t really like eating cake, so the birthday cake event was more about the theatre and spectacle than about actually eating the cake! A theme around smashing things seems to have become dominant for Stella’s cakes…
The cake itself was the one that over the years has become our favourite: chocolate Oreo cake with an Oreo buttercream filling and topping – it is unbelievably moist and delicious. I covered this (the day before the cake was served, so that it didn’t get too moist) with edible sand that I made by blending Graham Crackers, Digestive biscuits and different types of sugar (demerara, white, light brown soft sugars) to give some complexity and texture to the sand.
At the front of the cake, I made a scene with camels, palm trees (The canopies were left to set upside down in spherical silicone moulds) and an oasis. I covered the front section of the cake drum with turquoise-coloured sugarpaste and added edible sand. This allowed me to write Stella’s name and age as if we were writing on the beach. The oasis was covered in piping gel the day before serving to give the effect of water.
I made the mummies out of chocolate modelling paste. After a week, once they had hardened, I covered them in thin strips of white sugarpaste to make the bandages and added some (slightly) scary yellow eyes. The sarcophagi were made from sugarpaste with a lot of CMC glue to harden them, then decorated with edible gold paint and strips of coloured sugarpaste. The faces on the sarcophagi were made using a bought face mould.
The pyramid itself was made from four sections of pastillage (royal icing hardened with edible CMC glue), with some detailing added before they hardened using a brick impression mat. I left the sections to dry for a few weeks, then glued them together with royal icing. It took a few attempts to get this to work, as the sides tended to slide apart. I then dusted the finished pyramid with edible colour powders to give it an aged, rougher look.
I bought a hessian ribbon to decorate the sides of the cake drum. I also used pastillage to make a hammer, which I painted with colours and hieroglyphs.
Having ‘staged’ the mummies on the cake just before it was served, I then added the pyramid just before bringing it out. Luckily, the hammer broke the pyramid perfectly (and the mummies weren’t damaged).

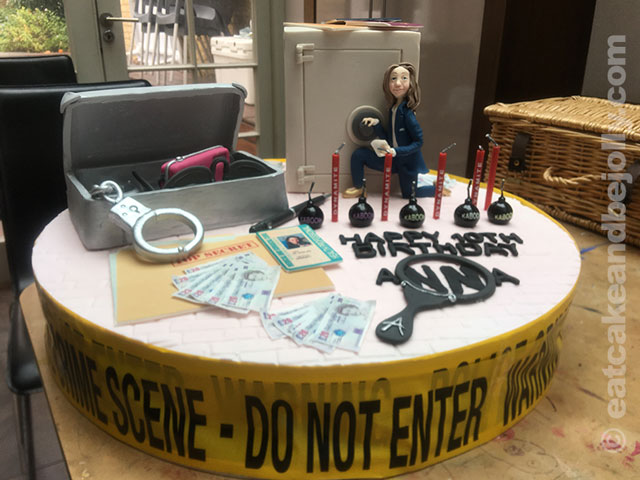
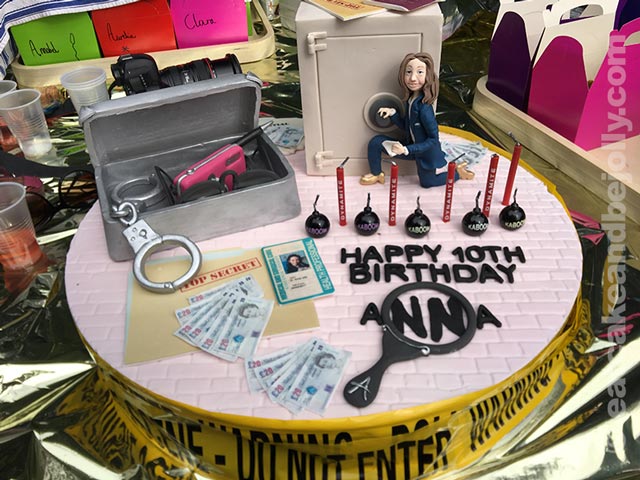
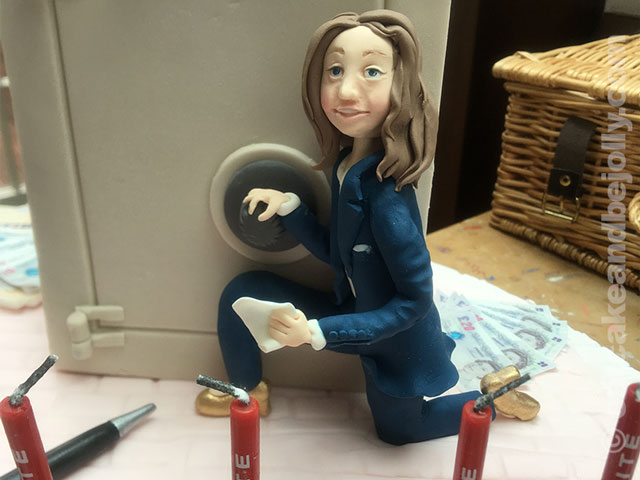
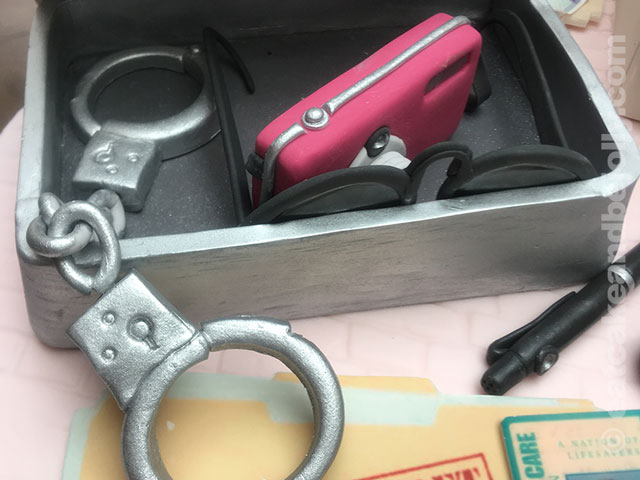
Spy Cake – Anna’s 10th Birthday (2017)
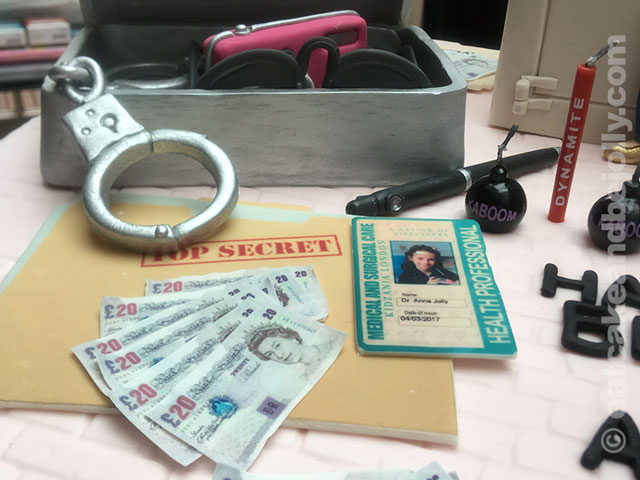
Anna was having a ‘spy quest’ party and wanted a suitable cake. She was obsessed by her favourite outfit, a skinny fit blue suit with sparkly gold shoes, so I wanted to feature her wearing this. I decided to have her cracking a safe, surrounded by money, top secret manila folders, passports (she has British and American passports, so I wanted to feature them both) and a suitcase of spy paraphernalia (spy camera pen, sunglasses, spy camera, handcuffs). I didn’t want a James Bond theme with guns, but did find some fun birthday candles – sticks of dynamite and caricature ‘kaboom’ round bombs. This was finished off with a magnifying glass that appeared to amplify the letters below.
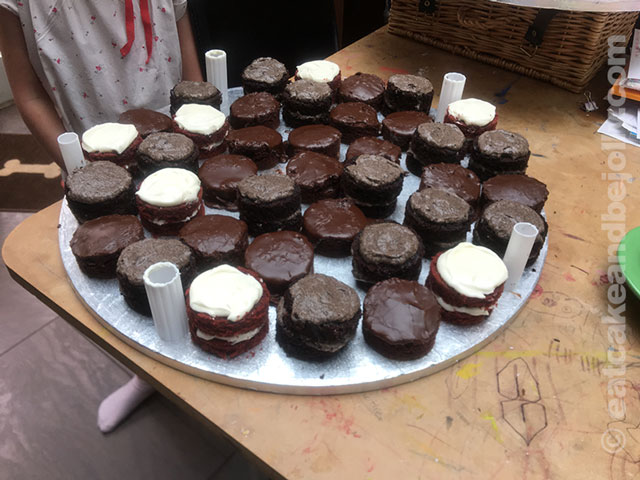
I set this all on a pink sugarpaste base with a brickwork pattern from a brick impression mat. As this was an outdoors party, I decided to make smaller cakes that the girls could choose one or more of. Anna has become very keen on Texas sheet cake (not really known here in the UK, so Anna described them as ‘like brownies’ to her friends!); the now (for us) quintessential chocolate Oreo cake with an Oreo buttercream filling and frosting; and red velvet cakes with cream cheese frosting. I made large cakes and cut them down to cupcake size with a round cutter.
I arranged the cakes on a separate cake drum of the same size and, as usual used cake dowels as pillars. I bought a roll of ‘Police Line: Do Not Cross’ tape and roughly wrapped this around the cake to fill the gap between the two cake drums to give the effect of a crime scene.

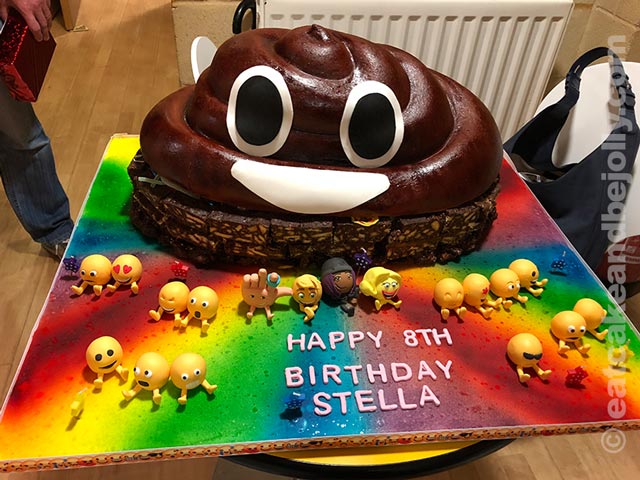
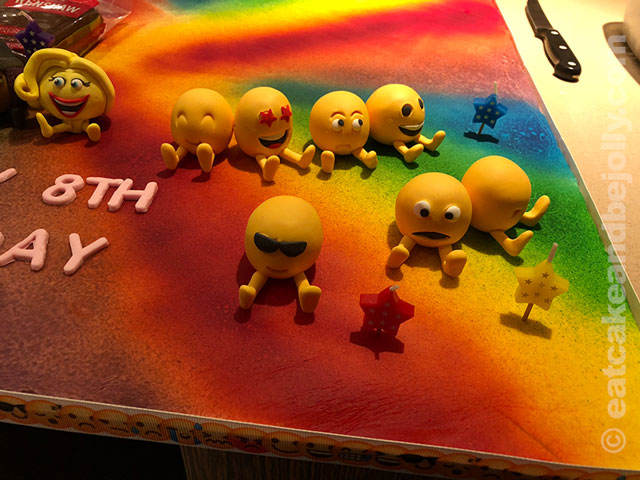
Poo Emoji Cake – Stella’s 8th Birthday (2017)
Children go through phases and embrace fads. One of these that I am hoping does not last for long is Stella’s obsession with ‘poo emoji’, having seen the Emoji Movie. I am pretty confident this will be the only cake I make that is based upon bodily excretions!
Once again, Stella wanted a cake without any cake. Rather, she wanted a giant poo emoji that she could smash with a hammer to reveal a centre full of candy. Basically, an edible poo emoji piñata.
I used a massive pile of sugarpaste as a mould, covered in cling film, and covered it with pastillage. I left this for a few weeks to harden (it really does become very stiff and could be easily, if carefully, handled and moved around). As the pastillage was white, I wasn’t sure how to colour it dark brown. Debbie lent me her airbrush kit, which I hadn’t used before and I experimented with it on separate pieces of pastillage that I made.
It took quite a few layers (about eight) to get a suitable effect, but it worked very well – looking disturbingly life-like. I had a back-up plan of using a thin layer of chocolate modelling paste, but luckily this wasn’t necessary. The early layers dried fairly quickly in an hour or so, but once there was already a thick layer of paint on the pastillage, subsequent layers of paint took longer to dry (about twelve hours).
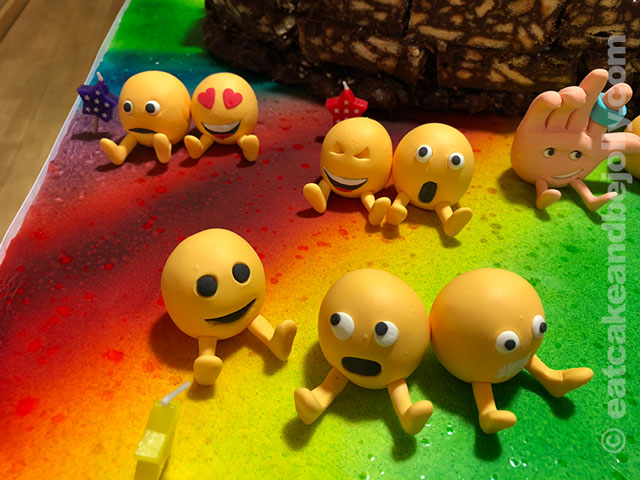
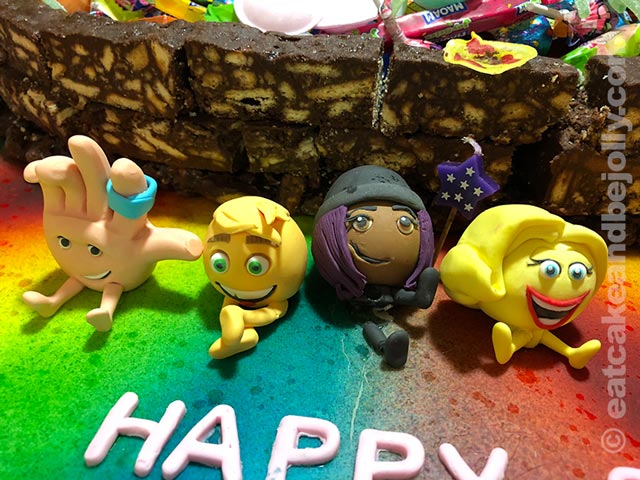
I also made a hammer from the pastillage, shaped to look like the real thing and, once it had dried, sprayed it with brown airbrush paint alongside the main structure. I made a series of small yellow emoji characters, as well as the other main characters from the Emoji Movie, modelled on some small characters that I bought. I decided, however, to make the large poo emoji figure more basic, as per the original emoji. I had the characters sitting down, but gave them all legs.
The base was made from left-over sugarpaste from inside the poo emoji mould, sprayed with the airbrush to give a series of rainbows (Stella still loves rainbow colours), with some simple lettering that Anna made. Both girls are now very keen on helping out with their sister’s cake, so I try to find some meaningful jobs for them to do, so that they can feel a real part of the process.
I used star candles, dotted around the board in the matching colour of sugarpaste (by Anna). I couldn’t find a cake drum large enough for the cake, so used a glue gun to glue two smaller ones together, with a smaller round cake board glued underneath for a bit of support. This wasn’t ideal, as I had to hold the cake carefully, but given our constraints in the run-up to the party, it was fine. The alternative was to get a piece of MDF cut to the right size by a lumber yard, then covering it in cake board foil to make it food safe.
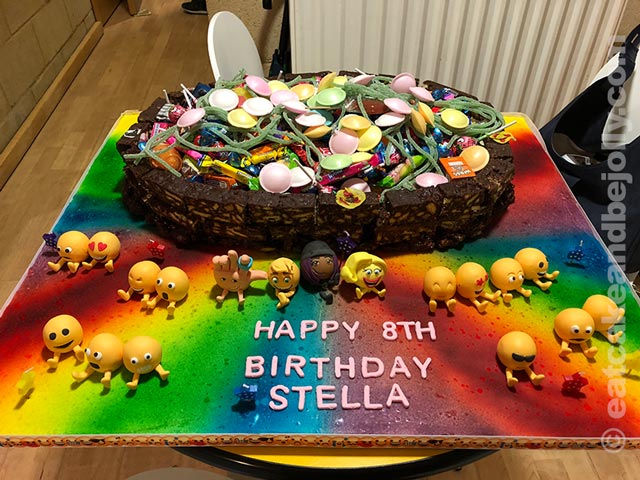
I made a large batch of Rocky Road from a family favourite recipe from Nigella Lawson. This was just big enough to fit in our fridge to harden. I then made simple chocolate biscuit cake (Prince William’s favourite – his entire wedding cake was made from it!) in square cake tins and chopped them up into bricks. These bricks were very useful, as they allowed me to follow the precise outline of the pastillage cover, as well as providing individual portion sizes for the girls at the party. I assembled this base and stored it in the fridge until the morning of the party, having made it a couple of days earlier.
Stella and I went to Kingdom of Sweets, almost certainly the largest candy store in London (on Coventry Street, just off Piccadilly Circus). We spent a fun hour choosing a whole stack of candy for the cake before delivering it safely home without being consumed!
My wife had been really rather unwell in the weeks before the party, so finding time to focus on the cake was challenging. Luckily, having got the main poo emoji shell made and the candy bought, the rest of the cake wasn’t too demanding and on the day, I simply needed to assemble things.
One small twist – it was raining (albeit lightly) on the day of the party and I didn’t have either the manpower to help cover the board as I transferred it from the taxi to the venue, nor an umbrella big enough to protect it, I just went as quickly as I could. Drops of water did land on the rainbow pattern on the board, but it made a rather pleasing sparkly effect that I really liked!
The poo emoji shattered very dramatically, and everything went off well. Given the amount of candy that the girls consumed (not many of the carrot sticks available got eaten), I am not sure many parents will have been delighted with this event!